Difference between revisions of "FTC The Challenge - Start Simple and Build 20221108"
From wikidb
(→A Simple Move Foreward) |
(→A Simple Move Forward) |
||
| (15 intermediate revisions by the same user not shown) | |||
| Line 1: | Line 1: | ||
| − | = Lab 5: Start Simple = | + | = Lab 5: Start with a Simple Strategy = |
Why | Why | ||
| Line 14: | Line 14: | ||
* [https://www.firstinspires.org/sites/default/files/uploads/resource_library/ftc/game-manual-part-2-traditional.pdf Game Manual Part 2 - Traditional Events] This document describes POWERPLAYSM presented by Raytheon Technologies, the FIRST® Tech Challenge game for the 2022-2023 season. | * [https://www.firstinspires.org/sites/default/files/uploads/resource_library/ftc/game-manual-part-2-traditional.pdf Game Manual Part 2 - Traditional Events] This document describes POWERPLAYSM presented by Raytheon Technologies, the FIRST® Tech Challenge game for the 2022-2023 season. | ||
| − | = Explore Potential Low-lying Fruit in Autonomous = | + | = Strategy: Explore Potential Low-lying Fruit in Autonomous = |
| − | + | == A Simple Move Forward == | |
| − | == | + | === Playing Field === |
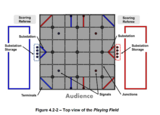
| − | * | + | * See Section 4.2.1 Fielc Illustration on Page 7 [[File:PlayingField.png | 160px]] |
| − | * See section 4.6: Scoring Summary, page 28 | + | === Scoring === |
| − | + | * Credit: John Delacy and Gavin Ford of the Benson FTC187 team. | |
| − | + | * See Part 2 of the Game Manual | |
| + | * 20 points 1/3 of the time. | ||
| + | * (Select images to enlarge it.) | ||
| + | * "Signal: Robot Parked only on the two Tiles that corresponds to the team supplied Signal Sleeve image" (Detecting the cone pattern adds some difficulty but takes the randomness away.) | ||
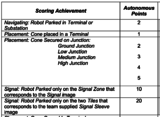
| + | * See section 4.6: Scoring Summary, page 28. [[File:AutonomousScoring.png | 160px]] | ||
| − | * | + | === Game Field Locations === |
| − | * [[File:SignalZoneLocations.png | | + | |
| − | * [[File:SignalBonus3b.png | 400px]] | + | * Move the robot from "Tile A2" to "Location 2" |
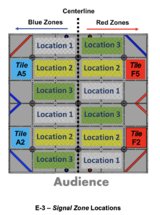
| + | * See appendix E - Randomization - Diagram E-3 - p 46 [[File:SignalZoneLocations.png | 160px]] | ||
| + | |||
| + | === Gameplay === | ||
| + | * See section 4.4.2: Autonomous Period Game Play | ||
| + | * On page 16, see 3) b) [[File:SignalBonus3b.png | 400px]] | ||
Latest revision as of 11:54, 29 November 2022
Contents
Lab 5: Start with a Simple Strategy
Why
Start with something simple that meets a simple core goal.
- It helps build confidence.
- It helps uncover misunderstanding
- It gets your foot in the door - you have something the sell.
References - 2022 - 2023 FIRST Tech Challenge
- Game and Season Information
- POWERPLAY Game Animation
- Game Manual Part 2 - Traditional Events This document describes POWERPLAYSM presented by Raytheon Technologies, the FIRST® Tech Challenge game for the 2022-2023 season.
Strategy: Explore Potential Low-lying Fruit in Autonomous
A Simple Move Forward
Playing Field
- See Section 4.2.1 Fielc Illustration on Page 7

Scoring
- Credit: John Delacy and Gavin Ford of the Benson FTC187 team.
- See Part 2 of the Game Manual
- 20 points 1/3 of the time.
- (Select images to enlarge it.)
- "Signal: Robot Parked only on the two Tiles that corresponds to the team supplied Signal Sleeve image" (Detecting the cone pattern adds some difficulty but takes the randomness away.)
- See section 4.6: Scoring Summary, page 28.

Game Field Locations
- Move the robot from "Tile A2" to "Location 2"
- See appendix E - Randomization - Diagram E-3 - p 46

Gameplay
- See section 4.4.2: Autonomous Period Game Play
- On page 16, see 3) b)

