FTC Staying out of Trouble Incrementally 20220401
Contents
Why
- There are many ways of getting into trouble when writing a program. One is to start with a working program, make a lot of changes and end up with a non-working program with no idea what you did to break it.
- A solution is to make a few change (add one to three lines of code) and then retest. If the program breaks, you know it happened because something in those new lines. This narrows your search for the problem saving you a lot of effort.
- It also helps you locate show stopper problems early. For example, if you've added a new motor but it will not work with your robot. You will discover this before you invest a lot of time in writing new code. Or you may misunderstand how to do some. You want to find that out soon.
- It adds confidence and provide you with proof that you are going down a good path. For example, your boss or teacher might wonder how you are doing. You can demonstrate the work you've done so far. Even though the program is not complete people and you will feel more confident.
- This will make it easier to compare color objects and understand how color works when we get to Tensorflow labs.
- This Best Known Method (BKM) is called Incremental Development, The Incremental Build Model.
- We will try this on the Drive in Square which we are having some problems with.
Phase 0: Start
Code
- DriveInASquare: Start with an empty turnForDegrees method
Phase 1: Convert Degree Turn to Wheel Distance
Focus on turn degrees to the distance in mm a turn wheel will need to travel
Code
@Autonomous(name="Drive in a square v01", group="Concept")
...
public  class DriveInASquare01 extends LinearOpMode
{
    int    SQUARE_SIDES       =   1;
    double TARGET_TURN        =  90;         // degrees
    ...

    public void runOpMode() throws InterruptedException
    {
        ...
        int count = 0;
        while (opModeIsActive() && count < SQUARE_SIDES)
        {
            //driveForMmAt (TARGET_DISTANCE, TARGET_VELOCITY);
            turnForDegrees (TARGET_TURN);
            count++;
        }
        ...
     }

    void turnForDegrees (double turnDegrees)
    {
        // See driveForMmAt for additional drive train characteristics
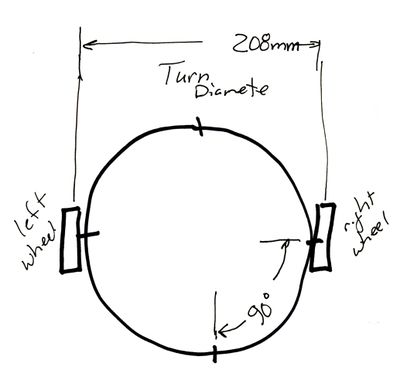
        double turnDiameter = 208;    // distance between wheels in mm
        double wheelDistanceMm = (3.14156 * turnDiameter * turnDegrees) / 360;

        telemetry.addData("   wheelDistance  ", wheelDistanceMm);
        telemetry.update();
    }
}
Geometry
We are assuming a Differential Wheeled Robot architecture. Our trialing robots have four wheel drive with the wheels on each side being connected. The result is wheel slippage which we do not account for. A fudge factor needs to be added. This is our computation.
In order to make a 90 degree turn the robot wheels must travel 1/4 of the way around the circumference circle formed by its wheels when on wheel is turn forward and the other in reverse. The diameter of this circle in the distance between the two wheels. As a result we get:
WheelDistanceInMM = PI * DistanceBetweenWheelsInMM * turnDegrees / 360 = 3.14 * 208 * 90 / 360 mm
Results
wheelDistance 163.36112
Giggle Test: Is this result reasonable?
Phase 2: Convert Wheel Distance to Number of Ticks
Why => because setTargetPostion requires number of tick to move.
Code
Modify turnForDegrees
    void turnForDegrees (double turnDegrees)
    {
        // See driveForMmAt for additional drive train characteristics
        double turnDiameter = 208;    // distance between wheels in mm
        double wheelDistanceMm = (3.14156 * turnDiameter * turnDegrees) / 360;

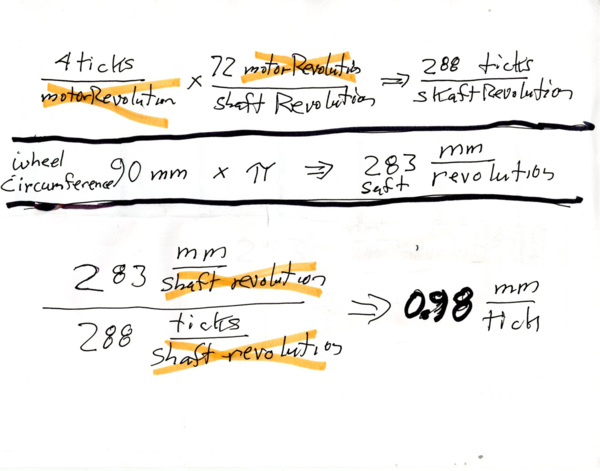
        double mMPerTick = 283.0 / 288.0;
        double ticksToMove = wheelDistanceMm / mMPerTick;

        telemetry.addData("   wheelDistance  ticksToMove  ",
                wheelDistanceMm + " " + ticksToMove);
        telemetry.update();
    }
Results
wheelDistance ticksToMove 163.36112 166.24735
Are the results reasonable?
Phase 3: Add the Motor Configuration Code
Code
Add the following motor configuration code to the turnForDegrees method.
        // reset the motors
        leftMotor.setMode(DcMotor.RunMode.STOP_AND_RESET_ENCODER);
        rightMotor.setMode(DcMotor.RunMode.STOP_AND_RESET_ENCODER);
        leftMotor.setTargetPosition((int)ticksToMove);
        rightMotor.setTargetPosition(-(int)ticksToMove);
        leftMotor.setMode(DcMotor.RunMode.RUN_TO_POSITION);
        rightMotor.setMode(DcMotor.RunMode.RUN_TO_POSITION);
Results
Program compiles and runs. We can't test the results until the motors start to turn. See next phase.
Phase 4: Add the Velocity Code
Code
Notice the following target velocity definitions at the beginning of the program.
   double MAX_MOTOR_VELOCITY = 600;         // mm / second
   double TARGET_VELOCITY    = MAX_MOTOR_VELOCITY / 4;
Add code to set the velocity. Stop when the target position is reached.
        leftMotor.setVelocity(TARGET_VELOCITY);
        rightMotor.setVelocity(-TARGET_VELOCITY);
        while (leftMotor.isBusy() || leftMotor.isBusy())
        {
            telemetry.addData("position  velocity ", leftMotor.getCurrentPosition() +
                    "   " + leftMotor.getVelocity());
            telemetry.update();
            idle();
        }
Results
position velocity 160 140
Position increased from 0 to 160 Velocity increases from 100 to 140
Wheels turned in opposite directions at a reasonable speed.
Phase 5: Complete Test for 4 Sides
Code
Modifications
Notice that we are not going to test for a 4 sided square and we are enabling move forward to complete the test. This constant is defined at the beginning of the program.
int SQUARE_SIDES = 4;
Modify to enable the forward leg of the square.
        while (opModeIsActive() && count < SQUARE_SIDES)
        {
            driveForMmAt (TARGET_DISTANCE, TARGET_VELOCITY);
            turnForDegrees (TARGET_TURN);
            count++;
        }
Add motor stop for completeness.
        // set motor power to zero to turn off motors. The motors stop on their own but
        // power is still applied so we turn off the power.
        leftMotor.setVelocity(0);
        rightMotor.setVelocity(0);
Phase 05 Proof of Concept
Version 05 is a proof of concept. It has received little testing and the various constants need fine tuning.
Results
The robot travels in the shape of something with five sides. The corners have not square. This is expected because we calculated the corner assuming we had a Differential Wheeled Robot robot. The standard design has only two wheels. Our robot has four wheels driven in pairs on each side. The result is wheel slippage violating our assumptions for computing a turn.
Problem and Solution: An annoying problem was that the right 4-wire sensor cable was not properly seated. As a result, the control hub did not receive a valid signal resulting in erratic behavior. The right motor revved up to full speed and did not stop. To solve the problem, the cable was given more slack and re-seated.
Additional Notes
Managing Units
References
- Encoders: How they work
- Choosing Encoder Modes
- Java setVelocity Example
- Encoder Navigation

